Posts

Showing posts from January, 2020

How to create Snapshot in Azure

Image
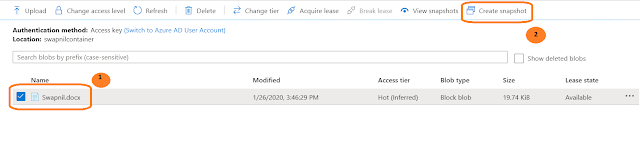
Hello guys, today we will look at snapshot feature in Azure. In the last blog we saw how to protect our resources from accidental deletion, but in case if your resource goes down, not because its deleted but may be because of the latest update which had some bug. This is very common for small companies who do not have a strong software testing team and failed to catch the bug. In such scenario maintaining the timely back-up is important and necessary, so that you recover the resource from the back-up and the business is back, live again with a small downtime. Taking backup is a good practice since disaster can happen any time and anywhere, you should be prepared for the worst case scenario. Snapshot is a back-up creation feature for Azure resources, inbuilt in Azure Portal. We can use snapshot to back-up resources such as: - Azure web app - Azure virtual machine - Files stored in Azure blob and many more... Snapshot are of 2 types: - Regular snapshot - Incremental snapshot

How to Protect your Azure Resource from Accidental Deletion

Image
Imagine a scenario where you have put so much effort to make a website live and on the day of launching, the website, you were surprised to see a “404 Not Found” message on the browser. This kind of nightmare can give you weeks of sleepless nights. In order to deal with the above-mentioned issue, Microsoft has provided a great feature in Azure wherein you can apply a lock on the resource, which will prevent the resource from being accidentally deleted. A simple feature but very useful. What are resource locks? Resource locks are a setting that can be applied to any resource to block modification or deletion. Types of Resource Locks: Delete Read-only Delete will allow all operations against the resource but block the ability to delete it. Read-only will only allow read activities to be performed against it, blocking any modification or deletion of the resource. Resource locks can be applied to subscriptions, resource groups, and to individual resources, and are inherite

Microsoft Web Matrix - to Manage Azure Web App

In this blog I would focus on a small mistake that can take a lot of time for us to debug and also will discuss about Microsoft’s WebMatrix tool. Scenario : Implementing a functionality of uploading a file in our application existing application and writing the data to a table. Steps : Open the application in visual studio. Create “UserUploads” folder in the project which will contain uploaded files Write the required piece of code, to upload a file and append the data to a table, in one of the controller (for MVC application). Run the program to check, it works for me since I can see the file data in required table. Now build and publish the functionality to live website. Check the functionality if it works in live website. For me it is not working. Possible Issues: file is not uploaded or file is uploaded but data is not written to the table Challenge: I was really confused as in what could be the possible reason behind this failure. The challenge here was, now

Making a Bot with Azure Bot Service

Image
Azure is getting richer day by day, Microsoft has recently added Azure bot service into their pool of services. This service makes the process of making a bot very simple. Earlier to the bot service, we used Bot Framework to make a bot, those who worked with bot framework would definitely like to move to bot service for their future work. How To Manage Your Work In Azure Bot Service? Azure bot service gives you the option to use Azure’s interface for coding your bot and deploying the same or to move your code to VSTS or to GitHub and manage the deployment of code from there. You can download your code from “setting -> continuous integration” tab under Azure bot service app and follow the steps given to start building the bot in your favourite IDE supported by Microsoft. Connecting Your Bot To Different Channels: It has became very convenient to connect your bot with different channels like Skype, Slack etc., thanks to Azure bot service. In this blog I will focus on connect

Integrating Power BI into Azure Web App

Power BI is a great data visualisation tool, which makes it easy to get insights from the raw data. The new functionality from Microsoft to integrate power bi into a web app makes it even more useful. In this blog I will show you how to embedded Power BI report into an Azure Web app. How Is Embedding Power BI Into Web App Useful? Gives you one point solution: If you are a decision maker of a company then you like to have a integrated view of your sales, marketing campaing, your expenses etc, Power BI does the same and with its embedding feature gets that onto your own website. Convenient for your clients : Since Power BI has row level security feature, you can share the reports of respective clients on your website without rendering to any third party solution. What All Is Needed? You need a Azure Subscription Power BI desktop application Power BI service account Visual Studio I assume that the Power BI Report is ready and is published to the Power BI Service account fr

How to Map Custom Domain to Azure Web App

In my previous blog, I had shown you how to create a azure web app with domain service enabled. if you notice the URL of the app, which is not at all user friendly, has domain name as “azurewebsites.net” and app name has some numeric figures attached to it (generally). It does not look good and gives rise to questions such as, What If I Need To Map A Custom Domain Name? What If I Need To Change The App Name? In this blog, I will answer these questions. So, let’s get started. One easy solution to the second question is that we should try and give a meaning full name while creating the app, but practically its difficult to get the name that we want because worldwide developers are using azure to create their apps. Another way of dealing with the challenge, which will solve both the issues, is using DNS records. We will use 2 types of DNS records. Types Of DNS Records: A records CNAME records These records are used to map custom domains to your azure web apps. DNS records

Create Azure Web App with Domain Service Enabled

Image
Domain Service Integration We as an organization have been leveraging Azure platforms as it allows very easy and quick development and deployment of solutions. Cloud hosted solutions often require accessibility by enterprise users as per their roles and access rights. This makes the domain services integration a critical part of deploying your web app. When I started building web apps, I often thought that I would have to handle the authentication by enabling of domain services on the web app externally by writing some code. Azure Has A Solution For It However Azure has made it very easy by making it just an option to choose. In this blog, I will be sharing the steps involved and some tips on what to do when you feel stuck with enabling domain services for your Azure Web app. I have used Visual Studio 2015 for developing my Web app, I have installed the Azure SDK so that I can publish my web app easily to the azure cloud. I presume that you have an Azure account which would